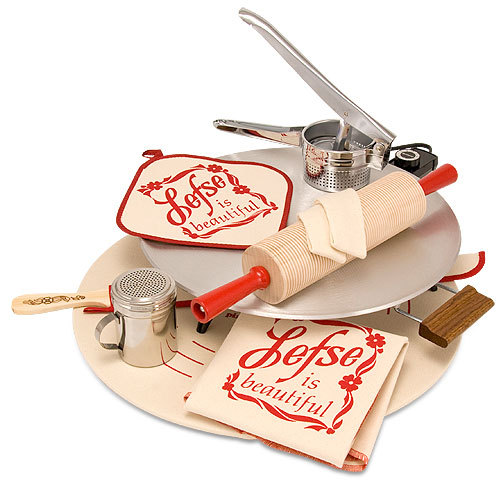
A couple of months ago I got a bug in my head to make Lefse. What is lefse, it is a traditional soft, Norwegian flatbread. Lefse is made out of potato, milk or cream and flour, and cooked on a griddle. Special tools are available for lefse baking, including long wooden turning sticks and special rolling pins with deep grooves. So guess what I got for my birthday...you got it... a deluxe Lefse making kit from Lefse Time.I guess my husband really wanted homemade lefse! The kit came fully loaded everything including the griddle and a booklet Making Lefse in 8 Easy Steps. Now I was ready!
 So I embarked on my first Lefse making journey . It really wasn't that bad now that I had all the official Lefse making tools and some tips from a group of Norwegian ladies on Face Book..thank you NT members for the warnings!
Lefse in 9 Easy Steps...more or less...I added an extra!
Aunt Charlotte's Lefse recipe ( From Lefse Time )
4 cups riced potatoes
1/4 cup butter
1/2 cup heavy whipping cream
2 tsp sugar
1 tsp salt
1 1/2 cups flour
Step 1: Boiling your potatoes
So I embarked on my first Lefse making journey . It really wasn't that bad now that I had all the official Lefse making tools and some tips from a group of Norwegian ladies on Face Book..thank you NT members for the warnings!
Lefse in 9 Easy Steps...more or less...I added an extra!
Aunt Charlotte's Lefse recipe ( From Lefse Time )
4 cups riced potatoes
1/4 cup butter
1/2 cup heavy whipping cream
2 tsp sugar
1 tsp salt
1 1/2 cups flour
Step 1: Boiling your potatoes
Peel 2 to 2 ½ lbs of russet potatoes. Rinse and cut potatoes in half and then quarters. It’s important that your potato pieces are of similar size so they are all cooked through at the same time. Place potatoes into a large pot of salted water and boil until fork tender. (You should be able to pierce potatoes with a fork easily.) This should give you 4 cups of riced potatoes equaling 12 lefse rounds, you can easily double this recipe for a larger batch. But if it is your first attempt do yourself a favor and start small!
Step 2: Ricing your potatoes
When the potatoes are done boiling, drain into a large colander. Drain well and rice. Don’t waste a lot of time here, your potatoes need to be warm to melt the butter in the next step. To help keep your potatoes warm, rice them into the empty pot you used for boiling. Rice all your potatoes and then measure out 4 cups (lightly packed) into another large bowl. Note: Make your ricing a bit easier and only fill the ricer basket 1/2 to 2/3’s of the way full. And take it slow, a lot of pressure all at once and the potatoes will come out too fast and all over. You don't want to get a potato burn!
Step 3: Well just step 3
To your 4 cups of riced potatoes, add 1/4 cup butter in pats so it melts in evenly. Stir a few times to get the butter mixed in well. Cover and refrigerate overnight. If you would like to cook the same day you can cover the potatoes with a towel and set aside on your counter top until they are completely cooled. Or to cool faster, place uncovered in refrigerator for 30 minutes, pull out and stir, refrigerate 30 minutes longer, stir. Keep repeating until cooled. Even faster? Use the freezer. Same process: freezer, stir, freezer, stir until cool.
or so the directions say. I made my potatoes the night before better safe than sorry!
Step 4: Get your lefse making area set up!
To your This is the step they left out of the booklet! Set up your work area and cover your table or area with a plastic cloth of some sort... making lefse requires a lot of flour and sometimes a lot of flour ends up all over the place!
Put lots of flour on your lefse board and your rolling pin!
Preparation is the key to success with rolling. Round pastry boards are great for rolling lefse. They have size guides to indicate how large your sheets are and can be a great guide to round sheets. Prep your pastry board by spreading out about 1/4 cup of flour into a circle just a bit bigger than the sheet of lefse you intend to roll. Rub the flour in thoroughly to your pastry cloth. You will need to lightly rub in a bit of flour onto your pastry board between each sheet, paying special attention to the center as it tends to build up the most moisture and could cause sticking. remember this it is important!!!!!

Prep your rolling pin by working flour into every groove of your pin. This can be sped up by rolling your pin directly into flour. For example, place a cup of flour onto a tray and roll your pin back and forth through the flour. Be sure to rub flour in on any missing spots and to rub in more flour between each lefse sheet. You can also use a rolling pin cover; it functions the same as a pastry cloth when prepped with enough flour.
Step 5: Mixing
To your cooled potatoes add the 1/2 cup whipping cream, 1 tsp salt, 2 tsp sugar and 1 ½ cups flour. If you have refrigerated overnight, break up the potatoes into small crumbles before adding the remaining ingredients. Once added, stir until most of the flour is worked in (loose crumbles). Then knead (like bread dough) 10 - 15 times. You can knead right in your mixing bowl. You should feel your dough come together into a smooth dough.
Step 6: Making the patties
Using a 1/4 cup measuring cup, scoop out patties onto a tray or cookie sheet, I ended up with 18 patties. Then shape each patty much like you would a hamburger patty – gently knead between your hands, roll into ball and press flat. It is very important that the edges of your patties are smooth with no cracks. Those small cracks will develop into bigger cracks as you roll. Set your patties aside to rest while you turn on your lefse grill and let it heat to 500 degrees. Note: A 1/4 cup patty rolls into a 12 inch thin round ;if you like thicker lefse roll to 10 inch round. Also you can do 1/3 cup patties which will roll into a nice and thin 14 inch round. If you like thicker lefse roll only to 12 inches.
Place patties on a cookie sheet and bring over to your work area.
Step 7: Rolling
Make sure there is lots of flour on your board! To begin rolling, flour your patty on both sides then place it down at the center of your prepped pastry board. Gently roll forward and back using mostly the weight of the pin, only a very slight downward pressure so that your patty becomes a small oval. Then either rotate your board slightly or change your angle and roll forward and back. Continue rotating or switching your angles so that you keep your lefse round and of even thickness. Keep rolling until you have achieved the size of lefse you’d like.
I rolled mine thin that's how we like them!
Step 8 : Transferring your rolled lefse to the griddle!
Using a lefse turning stick, slide the stick under the lefse sheet (middle of sheet) making sure to keep the tip of the stick down. Lift gently from the board and move quickly to the lefse grill. Matching the edge of your lefse to the edge of the lefse grill, lay the lefse down and “unroll”. Again you will need to move quickly, and in one smooth motion. If you miss the grill and part of your lefse is hanging off, let it cook for 10-15 seconds, then using a hot pad, lay it on top of the cooking portion of lefse and gently pull the lefse that is hanging off onto the grill. Another method to transfer is to flip the edge of a sheet over the stick and roll in a couple turns and then lift up, again match your lefse to the grill, lay down and unroll.
They make this step seem complicated but it's pretty easy just make sure you have the lefse stick flat side down...I found this out the hard way! Sorry no pics of this step because I couldn't multi task this one..
Step 9 : Grilling and chilling..as Bobby Flay would say!
Cook the first side 30 seconds, give or take. The surest way to know if your lefse is ready to flip is to watch for cues. Your sheet should bubble up and when you peek under the edge there should be light golden brown spots. Then run your lefse stick down the middle, lift and turn over using the same method mentioned in step 7. Cook the second side until you see the same signs. The second side will cook considerably faster than the first side as the sheet has been heated through. From there simply transfer your lefse to lefse cozies or towel (do not use towels laundered with scents).
Wipe off excess flour on your lefse grill with a dry cloth between each sheet to avoid burnt flour on your sheets.
While your first lefse is cooking you can start to roll out the next one but
make sure you re-flour your board well, especially the middle before you roll out your next lefse.
Repeat the above steps till all your patties are cooked.
Let about 10 to 12 sheets stack, cover with a cozy or towel, then set them aside to cool. If you see that your sheets have a bit too much flour, wait until cooled and dust off.
When all your lefse are cooked its clean up time and lefse eating time. I served mine with dinner that night! My kids...like to spread butter on the lefse, sprinke it with sugar than roll it up and eat it!
You can also,your lefse is completely cooled, fold in half, then half again and store in zip-top freezer bags. They will keep in the freezer for 6 months or more.
Pin It


